


Introduction
We have often seen many websites with an assistant like Google Assistant, Siri or lets take the one supported by Hashnode officially, Discord. So lets create one on our own. It's pretty simple though. Please brace yourself as this article may be somewhat long but will try to cover up all.
Dialogflow
Dialogflow is an end-to-end, build-once deploy-everywhere development suite for creating conversational interfaces for websites, mobile applications, popular messaging platforms, and IoT devices. You can use it to build interfaces (such as chatbots and conversational IVR) that enable natural and rich interactions between your users and your business. Dialogflow Enterprise Edition users have access to Google Cloud Support and a service level agreement (SLA) for production deployments.
Get Started
So lets login to the DialogFlow Console and start exploring around. First thing that you need to do is create an agent.
Once you have an agent up and running, you need to create Intent and train that intent with sample questions and answers. I will not deep dive into how to create one and train as you may find more information in their documentation or can find some samples online. But it provides you with something called small talk. You can enable that and fill out some common answers for the questions and you are ready to play with it.
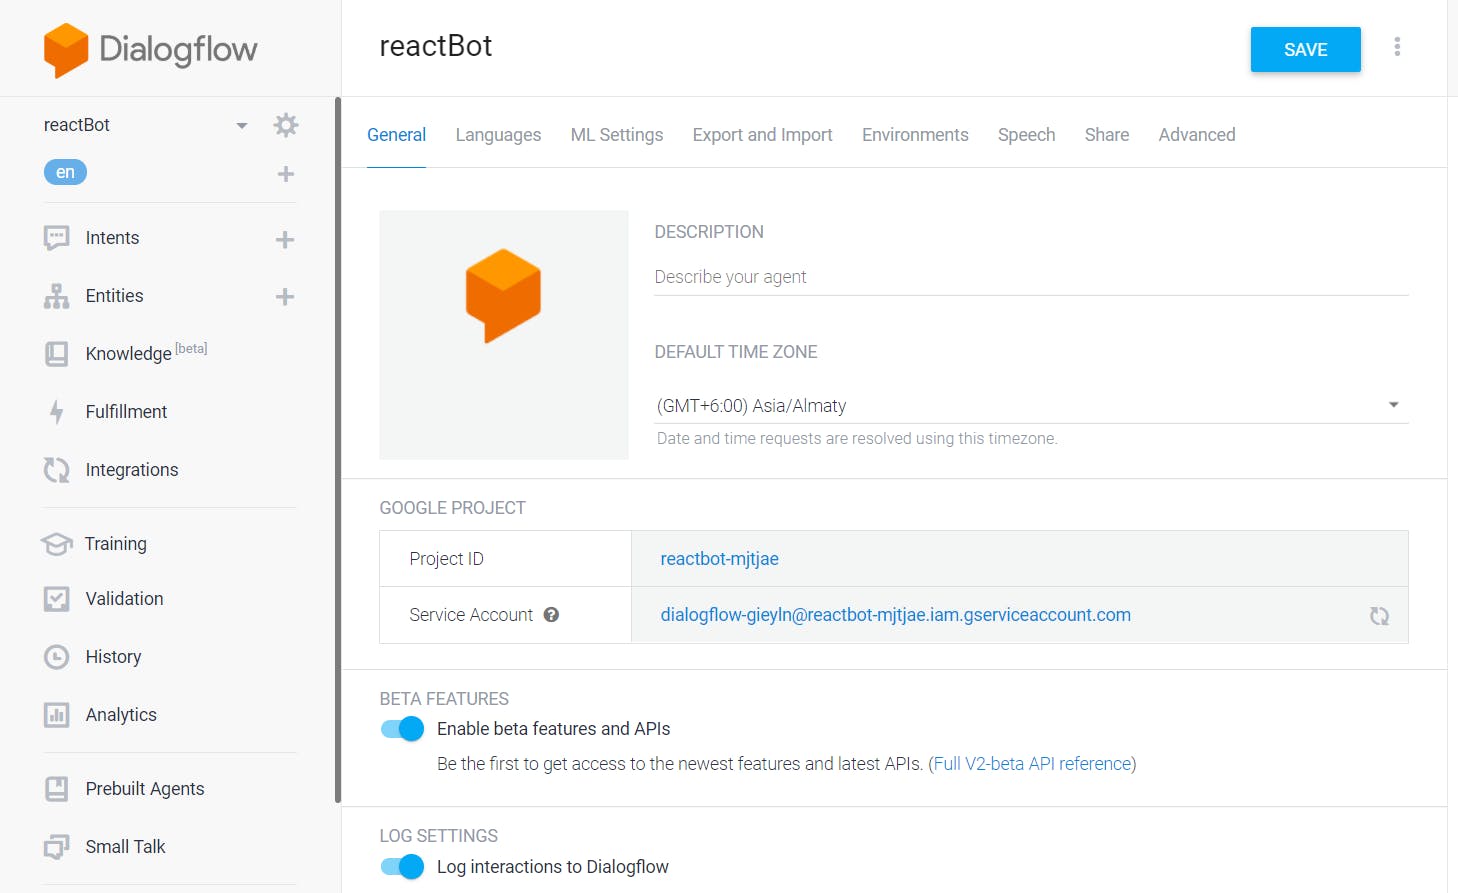
Now we need to do certain steps to get our integration done:
- Go to Dialogflow console and open settings by clicking on it next to your agent name.
- Note the project id and click on the link next to service account.
- Create a service account and set Dialogflow Role to Dialogflow API admin.
- Create a new key and choose JSON.
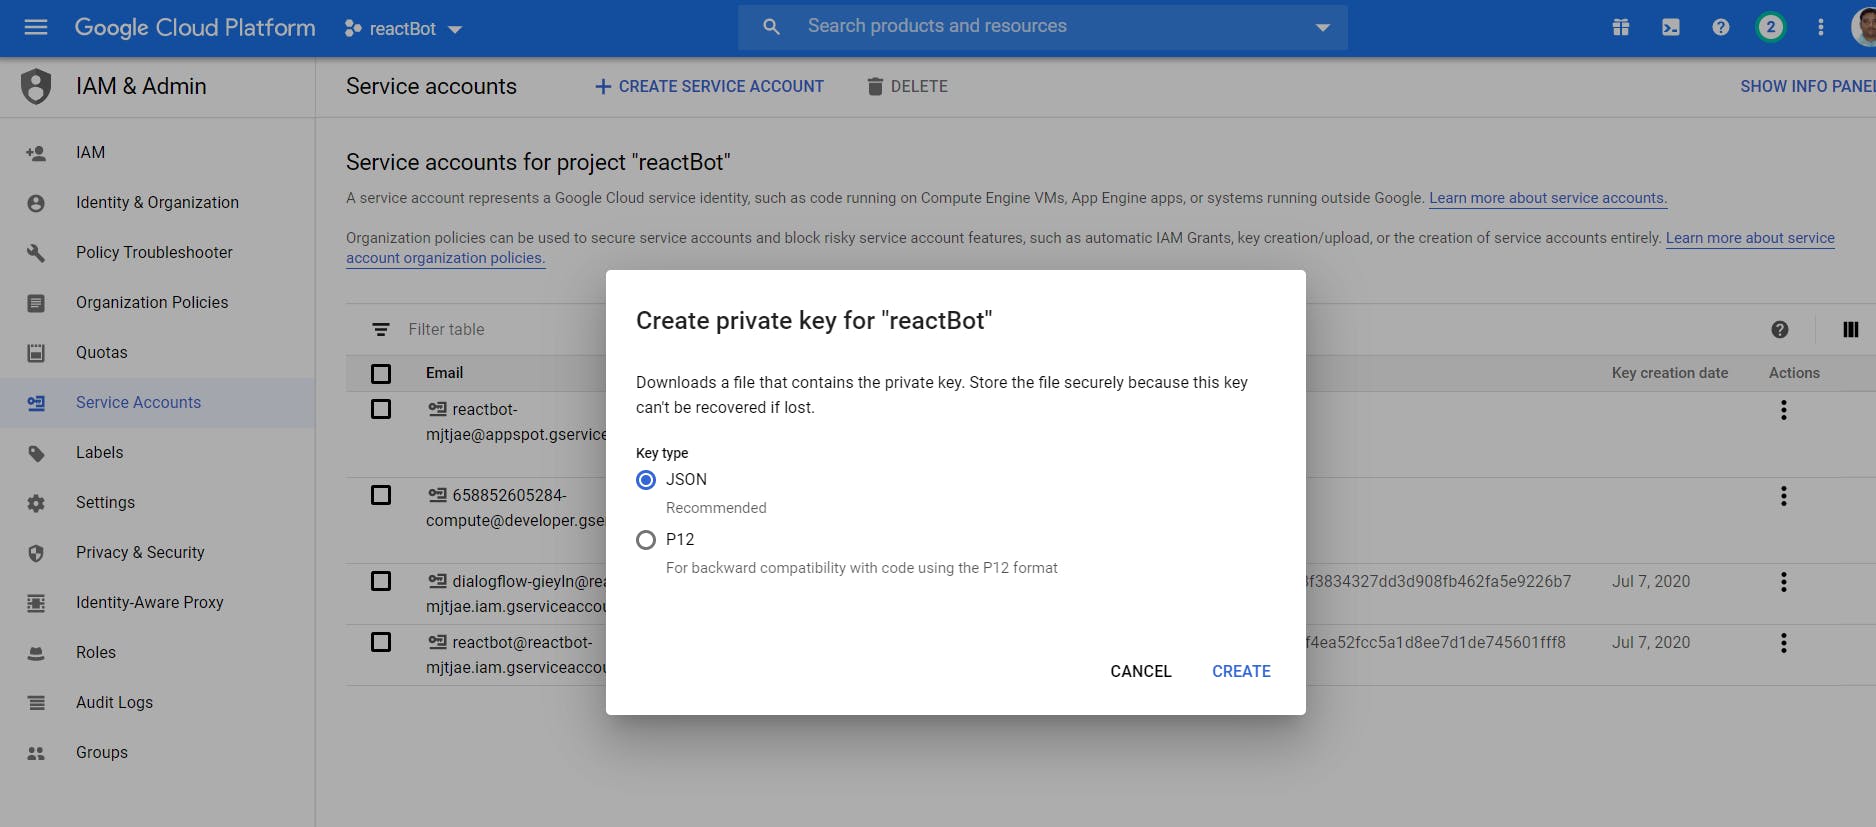
- Rename the downloaded JSON file to credentials.json. This is just so we can reference it easily. We will come back to this file later.
- Visit: gcloud sdk
- You have to install sdk into your computer. That will enable you to run the code
- Log in to your associated gmail account by running:
gcloud auth application-default login
Create React App and add Server
Now we can create one react app by executing:
npx create-react-app my-app
After this lets add one server, socket.io for Websocket and dialogflow library for communication and integration.
yarn add express dialogflow socket.io
Now lets build a simple server with a websocket configuration.
const express = require('express');
const socketio = require('socket.io');
const http = require('http');
const bodyParser = require("body-parser");
const router = require('./router');
const queryDialogflow = require('./dialogflow');

const { addUser, removeUser, getUser } = require('./users');

const app = express();
const server = http.createServer(app);
const io = socketio(server);
const port = process.env.PORT || 8000;

app.use(bodyParser.urlencoded({ extended: true }));
app.use(bodyParser.json());
app.use(router);

io.on('connection', (socket) => {
    console.log('We have a new connection!!!');

    socket.on('join', ({ name }, callback) => {
      const { error, user } = addUser({ id: socket.id, name });

      if(error) return callback(error);

      socket.join(user.room);

      socket.emit('message', { user: 'chatty', text: `${user.name}, how can I help you ?`});

      callback();
    });

    socket.on('sendMessage', async (message, callback) => {
      const user = getUser(socket.id);

      io.to(user.room).emit('message', { user: user.name, text: message });

      callback();
    });

    socket.on('askChatty', async (message, callback) => {
      const user = getUser(socket.id);

      const response = await queryDialogflow(message);

      io.to(user.room).emit('message', { user: 'Chatty', text: response });

      callback();
    });

    socket.on('disconnect', () => {
        const user = removeUser(socket.id);

        if(user) {
            io.to(user.room).emit('message', { user: 'Chatty', text: `${user.name} has left.` });
        }
        console.log('User had left !!');
    });
});

server.listen(port, () => console.log(`Server has started on ${port}`));
Integration with Dialogflow
Now its time to integrate our server with Dialogflow. We need to make use of the credentials file that we have downloaded earlier. Let's create a config folder and add dev.js with below details:
module.exports = {
    googleProjectID: process.env.GOOGLE_PROJECT_ID || <<project_id>>,
    dialogFlowSessionID: process.env.DIALOGFLOW_SESSION_ID || 'bot-session',
    dialogFlowSessionLanguageCode: process.env.DIALOGFLOW_LANGUAGE_CODE || 'en-US',
    googleClientEmail:process.env.GOOGLE_CLIENT_EMAIL || <<client_email>>,
    googlePrivateKey: <<private_key>>
}
Then lets create a basic Dialogflow communication code:
const dialogflow = require('dialogflow');
const config = require('./config/dev');

const projectId = config.googleProjectID;
const sessionId = config.dialogFlowSessionID;
const languageCode = config.dialogFlowSessionLanguageCode;

// Create a new session
const sessionClient = new dialogflow.SessionsClient();
const sessionPath = sessionClient.sessionPath(projectId, sessionId);

const queryDialogflow = async (text) => {
    //We need to send some information that comes from the client to Dialogflow API
    const request = {
        session: sessionPath,
        queryInput: {
            text: {
                // The query to send to the dialogflow agent
                text: text,
                // The language used by the client (en-US)
                languageCode: languageCode,
            },
        },
    };

    // Send request and log result
    const responses = await sessionClient.detectIntent(request);
    console.log('Detected intent');
    const result = responses[0].queryResult;
    console.log(`  Query: ${result.queryText}`);
    console.log(`  Response: ${result.fulfillmentText}`);

    return result.fulfillmentText;
};

module.exports = queryDialogflow;
That completes our backend code. Now lets add React code for the UI component.
React Chat Room
We acn create a basic Chat Room implementation like below:
import React, { useState, useEffect } from 'react';
import queryString from 'query-string';
import io from "socket.io-client";
import Messages from './Messages';
import Input from './Input';

import '../styles/Chat.css';

let socket;

const Chat = ({ location }) => {
    const [name, setName] = useState('');
    const [message, setMessage] = useState('');
    const [messages, setMessages] = useState([]);
    const ENDPOINT = 'http://localhost:8000/';

    useEffect(() => {
        const { name } = queryString.parse(location.search);

        socket = io(ENDPOINT);
        setName(name);

        socket.emit('join', { name }, (error) => {
          if(error) {
            alert(error);
          }
        });
      }, [ENDPOINT, location.search]);

    useEffect(() => {
      socket.on('message', message => {
        setMessages(messages => [ ...messages, message ]);
      });
    }, []);

    const sendMessage = (event) => {
      event.preventDefault();

      if(message) {
        socket.emit('sendMessage', message, () => setMessage(''));
      }
    };

    const askChatty = (event) => {
      event.preventDefault();

      if(message) {
        socket.emit('askChatty', message, () => setMessage(''));
      }
    };

    return (
        <div className="outerContainer">
            <div className="container">
                <h1>
                    Chatty the chatbot !!
                </h1>
                <Messages messages={messages} name={name} />
                <Input message={message} setMessage={setMessage} sendMessage={sendMessage} askChatty={askChatty}  />
            </div>
        </div>
    );
};

export default Chat;
We will create separate component to handle multiple messages and a separate one for handling Input and single message.
Messages.js
import React from 'react';
import ScrollToBottom from 'react-scroll-to-bottom';

import Message from './Message';

import '../styles/Messages.css';

const Messages = ({ messages, name }) => (
  <ScrollToBottom className="messages">
    {messages.map((message, i) => <div key={i}><Message message={message} name={name}/></div>)}
  </ScrollToBottom>
);

export default Messages;
Message.js
import React from 'react';
import ReactEmoji from 'react-emoji';

import '../styles/Message.css';

const Message = ({ message: { text, user }, name }) => {
  let isSentByCurrentUser = false;

  const trimmedName = name.trim().toLowerCase();

  if(user === trimmedName) {
    isSentByCurrentUser = true;
  }

  return (
    isSentByCurrentUser
      ? (
        <div className="messageContainer justifyEnd">
          <p className="sentText pr-10">{trimmedName}</p>
          <div className="messageBox backgroundBlue">
            <p className="messageText colorWhite">{ReactEmoji.emojify(text)}</p>
          </div>
        </div>
        )
        : (
          <div className="messageContainer justifyStart">
            <div className="messageBox backgroundLight">
              <p className="messageText colorDark">{ReactEmoji.emojify(text)}</p>
            </div>
            <p className="sentText pl-10 ">{user}</p>
          </div>
        )
  );
}

export default Message;
Input.js
import React from 'react';

import '../styles/Input.css';

const Input = ({ setMessage, sendMessage, message, askChatty }) => {
  const onKeyPress = (event) => {
    sendMessage(event);
    askChatty(event);
  };
  return (
    <form className="form">
      <input
        className="input"
        type="text"
        placeholder="Type a message..."
        value={message}
        onChange={({ target: { value } }) => setMessage(value)}
        onKeyPress={event => event.key === 'Enter' ? onKeyPress(event) : null}
      />
      <button className="sendButton" onClick={e => onKeyPress(e)}>Send</button>
    </form>
  );
}

export default Input;
If required, one more component can be added to allow user to submit their name and join this chat room.
Join.js
import React, { useState } from 'react';
import { Link } from "react-router-dom";

import '../styles/Join.css';

export default function Chat() {
    const [name, setName] = useState('');

    return (
      <div className="joinOuterContainer">
        <div className="joinInnerContainer">
          <h1 className="heading">Chat with Chatty</h1>
          <div>
            <input placeholder="Name" className="joinInput" type="text" onChange={(event) => setName(event.target.value)} />
          </div>
          <Link onClick={e => (!name) ? e.preventDefault() : null} to={`/chat?name=${name}`}>
            <button className={'button mt-20'} type="submit">Chat</button>
          </Link>
        </div>
      </div>
    );
  }
See it in action

Source Code
Full Source code can be found in :
Cover pic by freepik.